This article is about fake and counterfeit motorcycle gear. Firstly, I want to start by disambiguating between "fake" and "counterfeit" equipment. Counterfeit goods pretend to look like genuine, branded products. These are poorly cobbled-together replicas of the real thing. From a distance, they may look convincing, but upon closer inspection, it should be obvious they're not the real deal and offer the same level of protection as wrapping yourself in cling film. When I talk about fake gear, I'm talking about items sold as motorcycle PPE, typically from a brand you've never heard of but don't meet any protection standards. Again, as safe as cling film.
Counterfeits
When talking of counterfeit goods, it typically conjures images of Luis Vuitton handbags and Rolex watches. You're possibly already thinking of the stereotype; a weasel-faced man with a thin moustache offering you high fashion for low prices in the dark corner of an east-end pub. However, things have moved on, and the creators and peddlers of hookey gear have diversified their portfolios.
Seemingly, there's a fake version of everything these days. It doesn't matter if it's an iPhone, a high-end computer component or even the latest pair of Nike sneakers. Someone somewhere on the Internet will sell you a knock-off if you can't afford or can't get hold of the real thing. Sure, you may think you've found a bargain when you click to buy the latest PlayStation for £99.99, but when a white brick stuffed with soiled bandages and the innards from a 1998 Nokia mobile arrives at your doorstep, you're going to feel a little miffed.
The counterfeit industry is worth approximately $500bn each year, and while some may see it as a victimless crime, there is a darker, more insidious and horrifying side. When it comes to motorcycle clothing and equipment, it's not just depriving manufacturers of their hard-earned bread; it costs lives.
The proliferation and accessibility of these dangerous products are profoundly concerning. While researching this article, I found fake Alpinestars gloves, AGV helmets and even Brembo brake callipers. With a little more rummaging, I'd managed a full house of top motorcycling brands. While some items were touted as "replicas" and "just as good as the real thing", others were more devious, with no claims of legitimacy.
Of course, you may be wondering what the downside is. If someone's offering you Alpinestars GP Pro gloves and selling them for a tenth of the price, what's the problem? The problem is the products are dangerously ineffective. Research has shown leather with the structural rigidity of wet tissue, brake pads formed from compressed grass—no, I'm not joking—and gloves stitched together with thread so easily torn that it would only be of use in the construction of clothing for strippers. Your knock-off gloves may look great for the first few miles of riding, but when they start to fall apart at the seams a few days later, they're not going to seem like such a great bargain. Heaven forbid you should have an off in them.
Fakes
The problem isn't just with counterfeit goods, either. You may have seen adverts on social media offering you boots, gloves or jackets from a brand you've never heard of. At first glance, the gear may look the part with chunky, thick leather and stitching in all the right places. However, looks can be deceiving. Since April 2018, all motorcycle clothing has fallen under the scope of the EU PPE regulation. If a product is sold as protective motorcycle gear, it's deemed as PPE and, as such, needs to be tested and comply with EU and UK standards.
It used to be the case that motorcycle clothing only had to be certified to EN 13595 and carry the CE mark if it was used in a professional capacity. So unless you used a motorcycle as a police officer, courier or any other occupation requiring the use of a motorcycle, you didn't have to use clothing that met the requirements of EN 13595. However, most riders use their motorcycles for leisure and commuting, meaning clothing didn't have to comply. Until 2018, it would be rare to find motorcycle clothing certified to EN 13595. However, things changed. To cover items produced for leisure riders, EN 17092 was introduced. The new standard comprises a series of tests to ensure the gear you're wearing when you ride will keep you safe and protected.
There are a lot of letters and numbers going on here, so I've included a quick guide below. The focus is fairly broad but gives you an idea of what the labels inside your gear mean and some information on how they're tested. It's by no means intended to be a complete and comprehensive guide, but it should be enough to show what to look for.
Avoidance
Although seemingly cheap counterfeits and fakes might tempt you, it's simply not worth the risk to your safety. If an item seems too good to be true, it most likely is. If it's an offer for a fantastically low price, you have to ask yourself why and how? Have they skimped on material quality? Have they been poorly assembled in a backwater sweatshop? Are people being exploited? Have they skipped and/or faked certification? Is the warranty completely useless? Often, the answer to all of these questions is 'yes'. It's simply not worth the risk.
So how do you avoid buying fake or counterfeit items? It's pretty simple, really. Make sure you buy your gear from authorised, experienced retailers. Not only are you ensuring you're buying genuine items backed up by a warranty and aftersales service, but you'll also be doing everything you can to keep yourself safe. With Motorcycle Live happening this coming weekend, don't feel pressured into buying something because you feel like you're getting a bargain. Sure, have a look around, and see what's on offer. Still, if you want peace of mind with guarantees and warranties and the ability to return items easily, I'd thoroughly recommend supporting experienced, authorised retailers. In all senses of the word, they're there to protect you.
EN 13595
Items covered: Jackets, trousers, one-piece suits and two-piece suits for professional motorcycle riders.
The original test for clothing for professional riders comprises four parts. Part one details the requirements and examination procedures.
Part two is the Impact Abrasion test and involves the specimen being dropped at a distance of 50mm onto a 60-grit abrasive belt moving at 18mph. The test runs until the specimen is holed, and a time in seconds is used to determine a pass or a fail.
Part three is the Seam Burst Strength test. A circular specimen is cut from the clothing and clamped over a diaphragm. The material is slowly extended into a dome shape, applying force to the seam in all directions. The pressure required to burst the seam determines the result.
Part four is the Impact Cut test. A sample from the garment is mounted over a rectangular hole. A sharp blade is dropped onto the sample, and the maximum penetration of the blade through the material is measured.

EN 17092
Items covered: Jackets, trousers, one-piece suits and two-piece suits for all motorcycle riders.
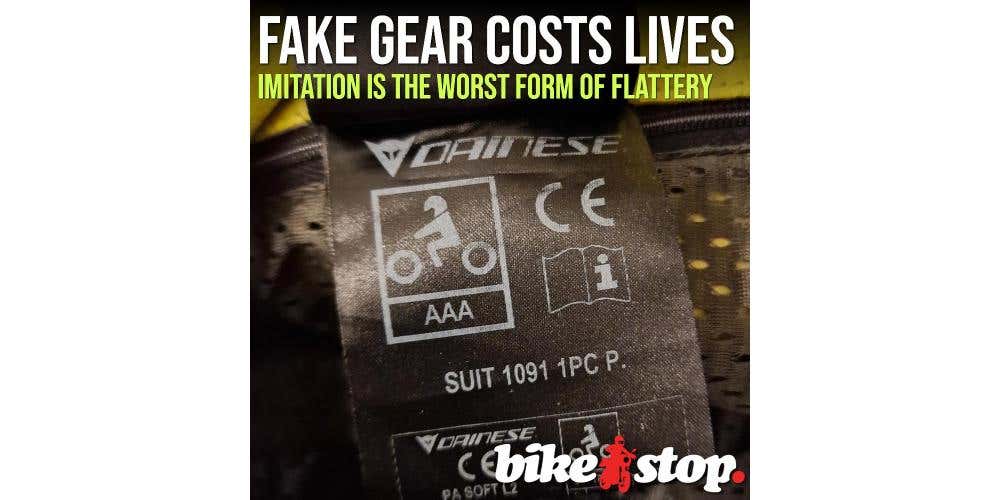
The new standard contains six parts. As with EN 13595, the first part details the requirements and examination procedures. Items can be tested as AAA, AA, A, B or C class, depending on their intended use.
Dimensional Stability: This test determines if a garment shrinks after washing or cleaning. If the item's dimensions grow or shrink by more than 5%, it's a fail.
Impact Energy Absorption: Elbow, shoulder, knee, and hip impact protectors must be present in Class AAA and Class AA clothing. Hip protectors are optional for Class A. Class B items should provide the equivalent of Class A but without requiring impact protectors. Finally, Class C items are designed to provide impact protection in areas only covered by the impact protectors and are typically used with under or over garments.
Impact Abrasion Resistance: Three samples of the material are mounted in holders at a 45° angle. They are then attached to rotating arms, dropped onto a concrete tile and allowed to come to a natural stop. This is performed three times. It's considered a pass if the samples complete the test without an opening of 5mm or more in any direction on the layer closest to the body.
Seam Strength: Each seam type, zip and protector pocket seam is tested for strength. If the seams maintain their integrity, the item passes.
Tear Strength: The test differs depending on whether it's a leather or textile garment and is used to determine the resilience to tearing.
Fit and Ergonomics: A test to ensure that garments fit in accordance with the manufacturer's size labelling. The assessor must be able to carry out all essential movements whilst wearing the garment.
Labelling for successful passes will vary from garment to garment, and its category rating is based on its application and is indicative of the level of protection. The first picture on the right shows a AAA-rating for a Dainese Kyalami CustomWorks 1-piece suit. The suit offers complete coverage with high abrasion resistance and armour in all the correct places.
The two photos immediately to the right show a pair of leather Dainese Delta 3 pants with an AA-rating and textile Dainese Tonale D-Dry pants with an A rating. You'll also notice the suit and leather pants don't display the box showing the standard. This was because these items were designed before the standard had been finalised. The textile pants were designed before finalisation in 2020, but met the provisional standard, which is why they bear the 'pr' prefix before the EN 17092-2:2017 tag.


EN 1621
Items covered: Soft protectors, back protectors, chest protectors, and inflatable protectors
If you buy replacement soft protectors, a back protector, chest protector or airbag, the labelling will show its compliance with EN 1621. If you buy a suit, trousers or jacket with removable armour built in, the label will detail each of the components with the garment.
EN1621-1 - Impact protectors: To pass the standard, the mean transmitted force must be below 35kN with no single value above 50kN. Level 1 protection must be below 18kN with no single value exceeding 24kN. Level 2 protection must be below 9kN with no single value exceeding 12kN. The type of protection offered is also shown:
- S - Shoulder
- E - Elbow
- H - Hip
- K - Knee
- K+L - Knee & Upper and Middle Tibia
- L - Front of leg, up to K protector
- KP - Knuckle Protection
You will also see a Type A or Type B designation. Type B denotes normal coverage, whereas Type A denotes reduced coverage for specialised applications.
As you can see from the photo on the right, the label inside my Dainese Kyalami shows the armour ratings for three of the four components (sorry, it was hard to photograph all four in the same shot). Each item, comprising the hip, shoulder, elbow and knee armour, is rated as level 2.
EN1621-2 - Back protectors: As back protection covers a larger area than smaller impact protectors, it gets its own category. Back protectors can be designated as B/FB for a full back protector, CB for the central back or L/LB for lumbar protection. The photo on the right shows the back protector that came with my Dainese Antartica jacket. You can see it's marked as a CB (central back) protector and meets the standard for level 2 protection.
EN1621-3 - Chest protectors: Level 1 chest protectors meet the standards for force transmission, whereas Level 2, typically seen on more rigid protectors, meets the standards for both force transmission and force distribution.
EN1621-4 - Inflatable protectors: You'll see this designation on any protector containing an airbag. These items are also tested for the time it takes to fully inflate. Again, split into Level 1 and Level 2 depending on force transmission.


EN 13634
Items covered: Motorcycle boots for all riders
If you've read this far, you're probably into the swing of things now. However, as of 2017, the labelling on boots goes into a little more immediate detail.
Looking at the photo on the right, we can see the familiar motorcyclist icon, meaning the boots are intended for motorcycling. We can see the box denoting the EN1334 standard of 2017, and below it we see four additional boxes, in this instance populated by '2's.
First box - Height: Simple enough, if it shows a '1' it's an ankle-high boot. If it shows a '2' it's a shin high boot. This information may not be present if you only see three boxes, as per the 2010 standard.
Second box - Abrasion Resistance: Area A covers the sole, back and front of the boot. Area B covers everything else. Samples are taken from each area and held against a moving abrasive belt until a hole appears. Level 1 must last 1.5 seconds for Area A and 5 seconds for Area B. Level 2 must last 2.5 seconds for Area A and 12 seconds for Area B.
Third box - Impact Cut: A blade on a mounting block is dropped on to the boot. For Area A the blade drops at 2m/s. For both Level 1 and Level 2 ratings, the blade mustn't penetrate more than 25mm. For Area B the blade is dropped at 2.8m/s. For Level 1, the blade mustn't penetrate more than 25mm, and for Level 2, it can't exceed 15mm.
Fourth box - Transverse Rigidity: The boot is crushed between two metal plates to simulate a bike falling on to it. If it taks less than 1kN of force to compress the sole 20mm, it's a fail. If it takes between 1-1.4kN it achieves a Level 1 pass. If it needs more than 1.5kN, it achieves Level 2.
There are optional tests available to acheive extended certification. On the photo you'll notice 'WR' and 'WAD' designations and it's possible you'll see other letters, too:
- WR: If a boot lets in no more than 3cm/sq of water after a simulate 4,600 steps or walking 1km whilst submerged in water, it passes.
- WAD: Water absorption and deabsorption. Basically, how quicly the boot holds and releases water.
- B: Breathability and the a test to ensure moisture can escape the boot.
- SRA/SRB/SRC: Slip resistance. SRA is a pass for testing on a soapy ceramic floor, SRB is a pass for a glycerol-coated steel floor and SRC means it passed both tests.
- FO: The sole's resistance to fuel/oil. If the weight of a boot increases no more than 12% after being soaked in fuel for 22 hours, it's a pass.


EN 13594
Items covered: Motorcycle gloves for all riders
Finally, we come to gloves, and we're definitely in the rhythm of understanding labels now.
Again, on the label, there's the little pictogram of the bike enjoying his Sunday ride (although his bike appears to be lacking a frame and engine), as well as two detail boxes and the standard designation.
There are five mandatory and one optional test for gloves.
Cuff Length: For a Level 1 pass, the measure from the wrist to the end of the cuff must be at least 15mm. A Level 2 pass requires a minimum length of 50mm.
Restraint: The mechanism which keeps the glove on your hand. This is typically the velcro strap around the wrist. A machine attempts to lift the glove off a dummy for 30 seconds. If it takes 52N of force to remove the glove from the hand, it gains a Level 2 pass. If it requires 27N of force to remove the gloves, it gets a Level 1. Anything less is a failure.
Tear Strength: As with the other tear strength tests, a machine attempts to pull apart three samples of the glove's materials. For a Level 1 pass, the palm and palm-side of the fingers must withstand 25N of force and the cuff, back of the hand, fourchettes and back of fingers must withstand 18N. For a Level 2 pass, the palm and palm-side of fingers must withstand 35N, the fourchettes 25N and 30N for the cuff, back of hand and side of fingers.
Seam Strength: A machine attempts to pull apart the seams of the gloves. A Level 1 pass requires 6Nmm for the main seams and 4Nmm for the fourchettes. For Level 2, those numbers increase to 10Nmm and 7Nmm, respectively.
Impact Abrasion: Similar to the Impact Abrasion test highlighted above, the gloves are dropped onto a moving abrasive belt. A Level 1 pass means no holing below 4 seconds, with a Level 2 pass requiring no holing below 6 seconds.
Impact Protection for Knuckles: This is an optional test and is indicated by a 'KP' designation in the information panel. A Level 1 pass means a single strike cannot transmit more than 9kN of force, and the mean force across all samples can't exceed 7kN. For Level 2, those numbers decrease to 4kN for both a single strike and the average.