'Winter is coming!' - well it seems it's arrived already all too quickly, and suddenly riding can lose its appeal. There are things you can do to keep riding during the winter, and that's what is going to be covered in this blog.
With worsening conditions, it becomes more and more important that your bike is functioning as it should be, and the only way to maintain this is to check key areas of your bike regularly. These checks apply the rest of the year however.
I'll start with the most frequent checks moving onto less frequent ones.
The first thing I check visually before riding my bike is my tyres - arguably one of the most important parts of a safe motorcycle at all times of year. You're looking for any obvious signs that the tyre is compromised - that can be things embedded into the tyre surface or wall, any cracks appearing due to perishing of the rubber, the wear of the tread and any cuts or chunks out of the rubber. The tread will push any water out of the way of the tyre so it's vital a good level is maintained (1mm across 3/4 of the tyre is the legal limit, but you'll want more for winter riding). Any other damage to the tyre can lead to a blowout - made even more likely when cornering when the tyre wall is more loaded. Pressures should be checked fairly regularly too with a dedicated gauge - follow your bike's specifications unless you feel something is off, and bear in mind weight limits. You also need to make sure you're not running too sporty a tyre - a decent sport touring tyre, such as the Michelin Pilot Road tyres, are ideal for wet and dry riding.

Next up it's your lights - and with days being shorter it's essential they're all working. All newer bikes will have their dipped beams on by default when the engine is on which is easy to check (along with high beam), as well as the tail light. Ensure all your indicators are working and then make sure both of your brakes trigger your brake light. The main causes of lighting issues will be blown bulbs (unless you have LEDs) or an issue with the switch (brake ones especially). A quick walk around with all lights on, and a tap on each brake will suffice to check. Keeping spare bulbs handy is always worthwhile. If you're parked against a wall it's also possible to check your headlight alignment, to make sure it's not blinding oncoming traffic.

This check is something you may do subconsciously anyway - your brake function. Just as you ride off make sure your brakes are working by giving them a gentle squeeze while you're still going slowly - this reduces the chance of any nasty shocks when you're going along at high speed and need to stop! It's unlikely your brakes will go wrong overnight, but if the bike is left a while it's definitely worth a check, especially with salt appearing on our roads in winter. Being aware of how much you have left of your pads is also worthwhile to plan servicing - just have a look inside your calipers to see how much material is left. Ensure your brake fluid level is up to standard too.
A more routine check next - your chain. When riding through wet conditions it pays to lube your chain soon after, and while you're doing that it's worth checking chain tension. Your manufacturer will give guidelines on the tension required - you can check it by sticking a pen or screwdriver under the chain and lifting, then check the amount you move up on a ruler. If it's out then you'll need to adjust which will involve loosening the rear wheelnuts and using the adjustors move the wheel backwards or forwards slightly. It's worth mentioning that the wheel must be straight or you'll end up with irregular wear (something you'd pick up in your first, most regular check). Depending on your bike, the adjustment marks on the swingarm may not be accurate and a measure from the swingarm bearing to the rear wheelnuts may be needed. It sounds complex, but it's a relatively simple five minute job. Included bike toolkits aren't always up to the task, so you may need a couple of spanners, or maybe even a small toolkit, and a torque wrench for the wheelnuts is a good idea too.
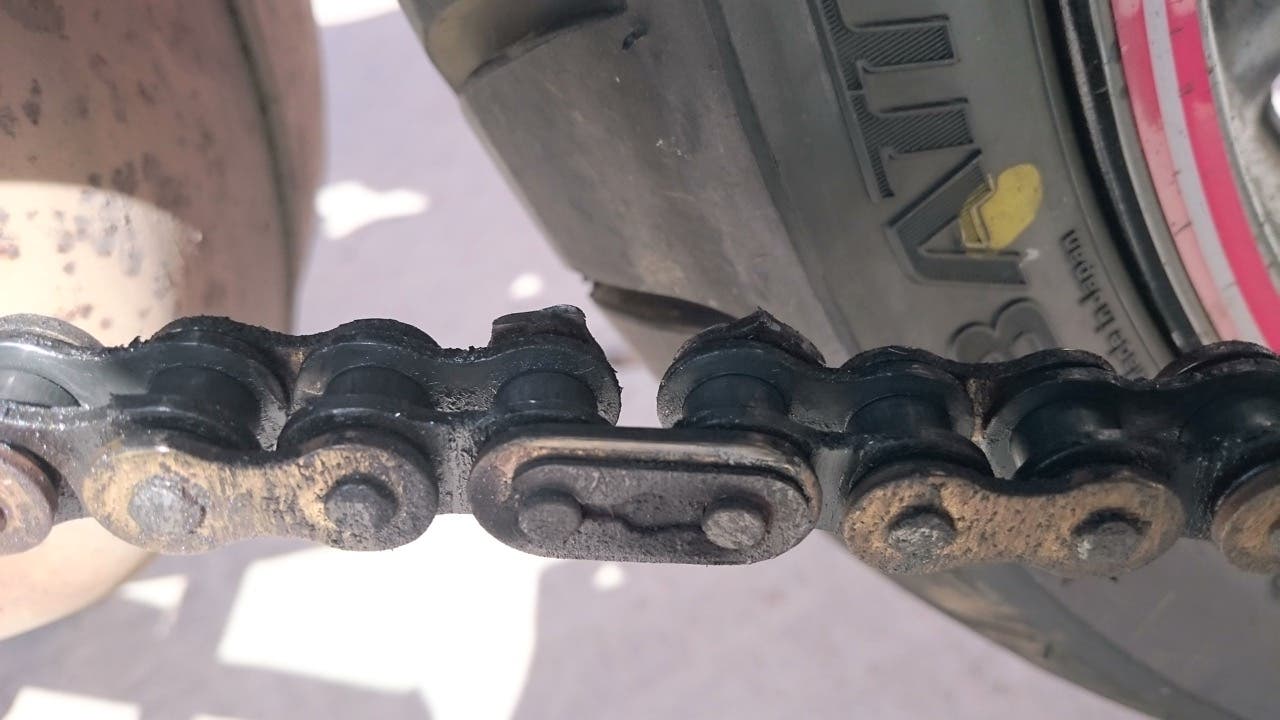
While you're there it's also worth checking for any seized links or damage - I once lost half a link in a relatively new chain while riding once, and only a regular check saved me from a potential accident.
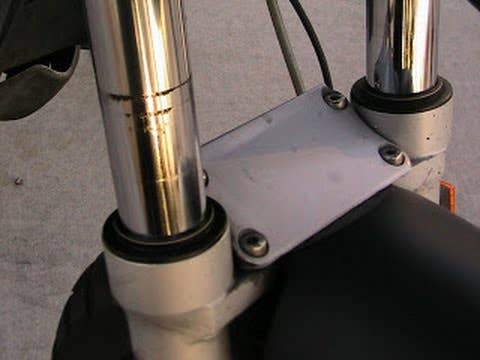
Suspension requires a cursory check every so often - namely the fork seals. If any debris gets into the seals, or they have perished, they can start to weep, and the oil will likely go straight down onto your brakes. Suffice to say it won't end well. A good shove down on the handlebars and a bounce on the saddle will let you check the state of your suspension - it should push down smoothly and rebound back into its original position without any further bouncing. A physical check with your finger on the front forks will show any oil, and a visual check of the rear shock(s) will let you see if there's any damage or corrosion on either the spring or the cylinder in the centre.
My final regular check is of your oil. Some bikes barely consume any oil, while other need continual top ups to run smoothly. Either way, it's worth checking regularly as warning lights usually only come on when the level is dangerously low - potentially resulting in engine wear, or even seizing. Some bikes will have a dipstick and others a sight glass to check the level - refer to your bike's manual for the correct procedure.
A lot of these checks are common sense, however they are easy to forget when you're commuting everyday or in a rush. It's impossible to overstate their importance though - they may just save you a hefty repair bill, or even your life.
Keeping your bike looking shiny during winter can be a nightmare, especially if you ride when it's wet after salt has been put on the roads. There are two main ways to do this - one reactive and one proactive. The most labour intensive method is to rinse the bike after every time its ridden and its cooled down in cold water. Obviously not every has the time (or motivation!) to do this. The other more proactive method is to apply an anti-corrosion agent prior to winter, such as ACF-50. It's applied by spraying onto the bike after a thorough clean and works as a barrier between metal and any grime that might want to land on your bike. You'll still need to wash it, but much less harm comes to the bike.

It's all well and good keeping your bike functioning, but what about you? You need to keep warm! A good choice of gear will keep some of the chill out, but at sustained speed no gear will keep you warm - that's wear heated equipment comes in. Heated grips are a common modification on many bikes, especially here in the UK - Oxford do decent ones that can be fitted to a wide variety of bikes. Heated gear is the ultimate solution however, with Keis being one of the leading brands, offering pieces of gear to heat all of your body - very nice on a chilly morning or evening.
 Here at Bike Stop we have a large range of items to keep you warm and safe on a bike this winter - visit us in Stevenage or take a look at our range of gear at bikestop.co.uk, or call us on 01438 317038.